Table of Contents
- Mastering the Basics of Hood Maintenance
- How Often To Clean A Kitchen Range Hood
- What You’ll Need
- Instructions
- How to Clean a Range Hood and Filter: Step-by-Step Guide
- When to Replace Your Kitchen Range Hood Filter
- Tips to Keep Your Kitchen Range Hood Clean Longer
- How to Clean Interior or Exterior of Hood With a Homemade Degreaser Solution
- Conclusion
- Related Topics
Mastering the Basics of Hood Maintenance
Are you tired of that sticky, greasy stuff that builds up in your kitchen? Here’s some good news: keeping your kitchen range hood filter clean is easier than you might think! A clean range hood filter can help keep your kitchen smelling fresh and looking great.
This article will show you easy steps to clean your kitchen range hood filter. Even if you’re not a kitchen expert, you can do this. We’ll break it down into simple, doable tasks that anyone can follow. No more struggling with the greasy mess!
Why is this important? Well, your range hood filter is like a sponge. It soaks up all the greasy air when you cook. Over time, this can make it less effective, and your kitchen might get smelly. But don’t worry; with a little TLC (Tender, Love, and Care), you can keep it in tip-top shape.
We’ll cover everything you need to know – from the tools you’ll need to the step-by-step process. And the best part is, you probably have most of these tools at home already!
So, get ready to say goodbye to grease and hello to a clean kitchen range hood filter. Let’s start with these simple and practical steps to make your kitchen feel fresh and inviting again!
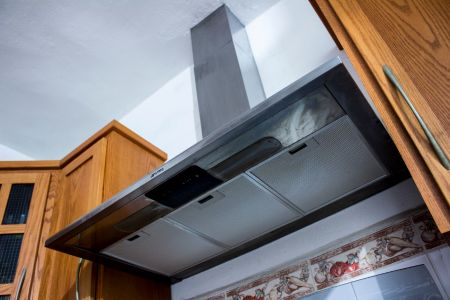
How Often To Clean A Kitchen Range Hood
When it comes to maintaining a fresh and clean kitchen, one often overlooked but crucial aspect is cleaning your kitchen range hood. A clean range hood ensures your kitchen stays odor-free and helps it look its best. So, how often should you clean your kitchen range hood to keep everything in tip-top shape?
Understanding the Importance
Regular cleaning of your kitchen range hood is essential because it prevents grease buildup. Over time, grease can accumulate, affecting the hood’s efficiency in trapping cooking odors and smoke. It can also become a fire hazard if left unattended for too long.
Frequency Matters
The frequency of cleaning your range hood largely depends on your cooking habits. If you’re an avid cook who often fries, grills, or uses oil in your dishes, you must clean your hood more frequently. In such cases, a monthly cleaning is a good rule of thumb to keep things in check.
However, if you’re a lighter cook and don’t use much oil, you can extend the cleaning intervals to once every three months. It’s all about finding the right balance that suits your kitchen activities.
Signs It’s Time to Clean
Look for signs like visible grease buildup, decreased performance, or lingering cooking odors. These indicators can help you determine when to roll up your sleeves and give your hood some love.
What You’ll Need

Equipment / Tools
- Soft nylon-bristled scrub brush
- Sink, large pot, or glass baking dish
Materials
- 1/2 cup baking soda
- 1 to 2 tablespoons degreasing dish soap
- Boiling water
- Spray-on degreaser or DIY vinegar solution
- Paper towels or cleaning rags
Instructions
How to Clean a Range Hood and Filter: Step-by-Step Guide
Keeping your kitchen range hood and filter clean is a simple yet effective way to ensure your kitchen remains fresh and inviting.
Here’s a step-by-step guide on how to do it:
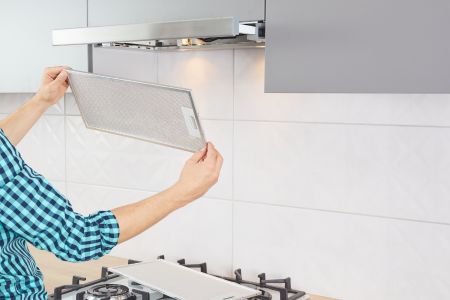
Step 1: Remove the Filter
Begin by locating the filter on the underside of your range hood, the side facing down onto the cooktop. Slide it out or find the release latch to remove a reusable filter.
Step 2: Prepare the Cleaning Solution
Next, prepare a cleaning solution. Fill a sink with boiling water; if a sink isn’t available, use a large heatproof pot or glass baking dish.
Add 1 to 2 tablespoons of dishwashing liquid to this hot water with a degreaser mentioned on the label. Include half a cup of baking soda and mix the solution thoroughly.
Step 3: Soak the Filter
Submerge the filter into the solution and let it soak for at least 15 minutes. During this time, there’s no need to scrub; allow the cleaning solution to work its magic.
Be sure to remove the filter before the water cools entirely, preventing the grease from resettling on the filter.
Step 4: Scrub the Filter and Rinse
Once the soaking is complete, use a scrub brush to remove any remaining grease or food particles from the filter.
Rinse it thoroughly with hot water and ensure it’s dry before placing it back in the range hood.
Step 5: Clean the Range Hood Surfaces
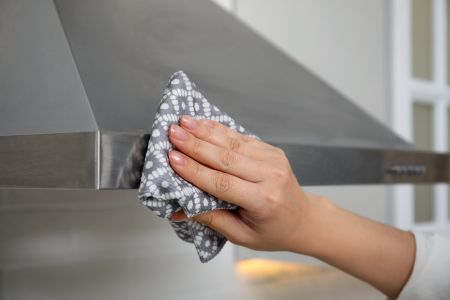
Now it’s time to clean the surfaces of your range hood. Start by applying a degreaser. Ensure that your stovetop is clear of utensils to avoid any drips. Let the degreaser or a homemade vinegar solution sit for at least 15 minutes.
Wipe away the degreaser using paper towels, removing the grime. For any stubborn particles, apply a bit of degreaser on a nylon-bristled brush and scrub those areas. Finish by wiping away any remaining residue.
Rinse the interior thoroughly with a clean paper towel, or cloth dipped in warm water to remove any remaining cleaner.
By following these simple steps, you’ll keep your kitchen range hood and filter in top-notch condition, ensuring a clean and pleasant cooking environment every time.
When to Replace Your Kitchen Range Hood Filter
Your kitchen range hood filter is essential for maintaining a clean and odor-free kitchen.
To keep it working effectively, watch for these signs indicating it’s time for a replacement:
1. Visible Damage
Inspect your filter regularly for holes, cracks, or damage. Replace it if you see any of these issues, as a damaged filter won’t work properly.
2. Reduced Efficiency
If your kitchen still smells of cooked food after cleaning the filter, it might be time for a replacement. An inefficient filter needs changing.
3. Extended Use
Filters become less effective over time due to grease and debris buildup. Most last 6 months to a year, but check your specific model and replace it accordingly.
4. Difficulty Cleaning
If it’s increasingly challenging to clean the filter, consider replacing it. A clogged filter is complex to clean thoroughly and will perform poorly.
5. Manufacturer’s Recommendations
Follow your manufacturer’s guidelines for replacement. Some brands provide usage-based recommendations to maintain optimal performance.
Replacing your kitchen range hood filter immediately ensures a clean, fresh, and odor-free kitchen.
Watch for these signs and follow manufacturer recommendations for the best replacement schedule.
Tips to Keep Your Kitchen Range Hood Clean Longer
To maintain the cleanliness and appearance of your kitchen range hood, consider these quick tips:
- Use the Right Cleaning Products: Use a suitable degreasing cleaner for the exterior surface and a soft cloth to remove grease. Match the cleanser to your hood’s material, whether stainless steel or painted metal.
- Prevent Streaks on Stainless Steel: To avoid streaks on stainless steel, polish it with a microfiber cloth and a few drops of olive oil.
- Regular Maintenance: Dust your decorative hood weekly to prevent buildup, and give it a thorough monthly cleaning to keep it looking its best.
- Care for Different Materials: If your hood is made of copper or brass, follow the recommended care guidelines to maintain its appearance, whether you prefer it to be polished or with an aged patina.
With these simple tips, you can ensure your kitchen range hood remains clean, beautiful, and functional for a long time.
How to Clean Interior or Exterior of Hood With a Homemade Degreaser Solution
When dealing with stubborn grease on your range hood, you can easily clean it using a homemade degreaser solution. All you need is plain white vinegar. This mild yet powerful natural cleaner can effectively break down grease without harsh chemicals or strong odors. Apply the vinegar to the greasy areas, let it sit for a few minutes, and then wipe clean. Your range hood will be grease-free and refreshed in no time.
Conclusion
Maintaining a clean kitchen range hood is essential for a fresh and efficient cooking space. From knowing when to replace your filter to using homemade degreaser solutions, you’ve learned valuable tips to ensure your range hood stays in top shape.
A clean range hood keeps your kitchen odor-free and ensures optimal performance. Following the guidelines provided here, you can enjoy a more pleasant cooking experience and an inviting kitchen.
Related Topics
Explore these related topics for more tips on kitchen cleaning and range hood cleaning and maintenance: